This post may contain affiliate links. If you buy something from one of our links we may earn a commission. Thanks
🥬 How to Grow Microgreens Indoors Beginner-Friendly Guide
If you’ve ever wished you could grow fresh greens without a backyard, microgreens are your new best friend.
They don’t need much space, grow quickly, and give you a big hit of flavor in a tiny handful.
With a shallow tray, some seed, and a sunny spot or small grow light, you can be cutting your first harvest in about a week.
In this guide, you’ll learn exactly how to grow microgreens indoors step by step, how to avoid slimy or moldy trays,
and which varieties are the easiest to start with in a small space.
Start Here: Main Microgreens Guide 🌱
This is the core beginner guide in our Microgreens & Baby Greens series.
If you’re new to growing microgreens indoors, begin here — then explore our supporting pillar guides below.
Supporting Guides in This Series
- Growing Microgreens at Home –
A practical guide that expands on choosing trays, finding light, and fitting microgreens into a weekly harvest routine. - Baby Greens –
A companion guide for growing slightly larger indoor greens like spinach, lettuce, kale mixes, and other cut-and-come-again varieties.
These guides support this article, but How to Grow Microgreens Indoors is the primary, start-here pillar for the entire Microgreens & Baby Greens category.
What You’ll Learn 🌱
- 🌿 What microgreens are and why they’re perfect for indoor beginners
- 🪴 Which trays, grow mediums, and seeds you really need (and what you can skip)
- 💡 How much light microgreens need and when a grow light helps
- 💧 How to water microgreens without causing mold or soggy roots
- ⏱️ How long microgreens take from seed to harvest (it’s fast!)
- 🚫 How to fix common problems like mold, yellow leaves, and floppy stems
- 🥗 Which microgreen varieties to try first and how to use them in everyday meals
What Are Microgreens, Exactly?
Microgreens are young, edible seedlings of vegetables and herbs.
You harvest them when they’re just a couple of inches tall, usually after the first true leaves appear.
That means you’re eating the stem and baby leaves, when flavor and tenderness are at their peak.
Unlike sprouts (which are grown in water and eaten root and all), microgreens are grown in a shallow layer of growing medium
and harvested above the surface. They’re cleaner, less fussy from a food-safety standpoint, and easier to fit into an indoor routine.
Microgreens vs. Sprouts vs. Baby Greens
- 🌱 Sprouts: Grown in water or jars, eaten root and shoot together, ready in a few days.
- 🌿 Microgreens: Grown in a shallow tray with a grow medium, cut at the base, ready in 7–21 days.
- 🥬 Baby greens: Grown a bit longer until leaves are larger, often cut-and-come-again.
As a beginner, microgreens give you fast results like sprouts, but with the cleaner, more familiar setup of growing in a tray.
Why Grow Microgreens Indoors?
- ⏱️ Fast harvests – many microgreens are ready in 7–10 days.
- 🏠 Small-space friendly – a single windowsill can hold multiple trays.
- 🌦️ Year-round growing – keep harvesting even when it’s cold or dark outside.
- 💵 Budget-friendly – a packet of seed can fill multiple trays.
- 🍽️ Big flavor in tiny bites – perfect for topping salads, sandwiches, bowls, and more.
Basic Requirements for Indoor Microgreens
Before you dive into the step-by-step, it helps to know what microgreens need to thrive indoors:
- 💡 Light: Bright indirect light from a window, or a simple LED grow light.
- 🌡️ Temperature: Most microgreens like 60–75°F (15–24°C).
- 💧 Moisture: Evenly moist (not soaked) growing medium.
- 🌬️ Airflow: Light air movement to help prevent mold.
- 🪴 Shallow trays: 1–2 inches deep is plenty for most varieties.
What You Need to Get Started (Simple Supply List)
- 🪴 Shallow trays (with or without drainage; 10×20 is standard, but any shallow food-safe container can work).
- 🌱 Seeds: Choose seed sold for microgreens or high-quality veggie/herb seed.
- 🧴 Spray bottle or gentle watering can for misting or bottom watering.
- 🧺 Growing medium: Coco coir, potting mix, or soil-less grow mats.
- 💡 Light source: Bright window or LED grow light.
- 🛡️ Humidity dome (optional): A clear lid or plastic wrap for the first few days.
Choosing the Best Growing Medium for Indoors
You have a few options for what your microgreens will grow in. Some are cleaner and more convenient indoors than others:
🌴 Coconut Coir (Top Pick for Indoors)
Coconut coir is made from coconut husks and works beautifully for microgreens.
It holds moisture well, doesn’t get muddy, and is much less messy than garden soil.
It’s also peat-free, which many gardeners prefer.
🧵 Coco or Hemp Grow Mats
Grow mats are thin, compostable mats made from fibers like coco or hemp.
They’re a great choice if you want a low-mess, soil-less setup.
Just moisten the mat, sprinkle seeds, and keep it evenly damp. They can’t hold as much water as potting mix,
so you’ll check them a bit more often, but cleanup is as easy as lifting out the mat when you’re done.
🪴 Potting Mix
A good-quality, soilless potting mix also works well. It’s forgiving, holds moisture nicely, and is easy to find.
The only downside indoors is a bit more dust and mess compared to coco coir or mats.
If you’re just starting out, try coconut coir or grow mats first. They’re clean, light, and perfect for a kitchen-counter or windowsill setup.
Step-by-Step: How to Grow Microgreens Indoors
Step 1: Prepare Your Tray
- Fill your tray with about 1 inch of pre-moistened coco coir or potting mix, or lay a coco/hemp mat flat in the tray.
- Level the surface with your hand so seeds will sit evenly.
- You want the medium moist like a wrung-out sponge — damp, not dripping.
Step 2: Sow Your Seeds
- Sprinkle seeds evenly over the surface; aim for a “solid carpet” of greens without big clumps.
- For tiny seeds (like broccoli or kale), a little extra density is okay.
- For larger seeds (like peas or sunflower), give each seed a bit more room so they don’t crowd and rot.
- Gently press seeds into the surface so they make contact with the medium.
Step 3: Cover and Germinate
- Mist the seeds lightly with a spray bottle if the surface looks dry.
- Cover with a humidity dome, another tray turned upside down, or plastic wrap with a few holes.
- Keep the tray in a warm, dark or low-light spot for a few days while seeds germinate.
- Check daily and lightly mist if the surface starts to dry.
Most microgreens will start to sprout in 2–4 days, depending on the variety and temperature.
Step 4: Move Under Light
Once most seeds have sprouted and you see little white stems and seed leaves, it’s time to give them light.
- Remove the cover and move the tray to a bright window or under a grow light.
- If you’re using a light, keep it just a few inches above the tops of the plants.
- Aim for 12–16 hours of light per day for strong, sturdy growth.
If your microgreens grow tall and floppy (leggy), they probably need more light or the light needs to be closer.
Step 5: Water the Right Way
Microgreens like consistent moisture, but they don’t like soggy roots or wet foliage.
- Check moisture daily by touching the medium — it should feel damp but not muddy.
- Whenever possible, bottom-water by pouring water into a solid tray and placing your growing tray inside it for a few minutes.
- If you top-water, use a gentle spray and try to keep foliage from staying soaked for hours.
- Good airflow (a small fan on low across the room) helps prevent mold and keeps stems strong.
Step 6: Harvest Your Microgreens
Most microgreens are ready to harvest when they’re 2–3 inches tall and have their first set of true leaves.
- Use clean kitchen scissors or a sharp knife.
- Hold a handful of greens and cut just above the growing medium.
- Gently shake off any loose bits of coco or mix.
You can harvest the entire tray at once, or cut a section at a time as you need it.
Step 7: Store and Use Your Harvest
- Line a container with a paper towel, add dry microgreens, and cover with a lid.
- Store in the fridge and try to use within 3–7 days for the best flavor and texture.
- If you wash them, do it gently and dry thoroughly before chilling to avoid sliminess.
How Long Do Microgreens Take to Grow?
The timeline depends on the variety and temperature, but here’s a general guide:
- ⚡ Fast growers (7–10 days): Radish, mustard, arugula, cabbage.
- ⏱️ Medium (10–14 days): Broccoli, kale, mesclun mixes, clover.
- 🐢 Slower (14–21 days): Basil, cilantro, some herbs and grains.
Do Microgreens Grow Back After Cutting?
Some microgreens, like peas or certain grains, may regrow a small second harvest if you leave the roots in place and keep watering.
Others, like many brassicas (broccoli, kale, cabbage), usually do not regrow well after cutting.
As a beginner, it’s best to treat each tray as a one-and-done crop.
Harvest, compost the roots and medium, and start a fresh tray for the most predictable results.
Best Places to Grow Microgreens in Small Spaces
- 🪟 A sunny kitchen windowsill.
- 🧺 A small shelving unit with a basic LED shop light.
- 🧂 Countertop space near a window.
- 📚 A bookcase or rack with clip-on grow lights.
- 🏢 An office desk with a small grow light for year-round greens.
Easy Ways to Use Microgreens in Everyday Meals
- 🥗 Toss a handful on top of salads for extra crunch and flavor.
- 🥪 Add them to sandwiches, wraps, and burgers.
- 🍳 Sprinkle on omelets, scrambled eggs, or frittatas.
- 🍚 Use as a garnish on grain bowls, stir-fries, and soups.
- 🍕 Top homemade pizza right before serving for a fresh finish.
Popular Microgreens You Can Grow Indoors 🌱
Once you’ve tried a couple of starter trays and gotten the hang of watering, light, and harvesting, the real fun begins—choosing which microgreens to grow next.
Each variety has its own flavor, texture, and personality, and you already have full step-by-step guides for nearly all of them.
Use this section as your “menu” and click through to any microgreen for detailed tips, seed density, grow-medium suggestions, and troubleshooting.
Fast & Flavor-Packed Microgreens ⚡
- Radish Microgreens:
Super speedy and full of spicy crunch. Great for tacos, sandwiches, and salads—perfect if you want a fast, reliable harvest. - Mustard Microgreens:
Bold, zesty heat with a wasabi-like bite. A fun choice if you love strong flavors in small doses. - Arugula Microgreens:
Peppery, flavorful greens that pop up quickly. Delicious on pizza, eggs, or fresh pasta. - Cabbage Microgreens:
Mildly tangy and easy to grow. A great beginner pick that adds crunch to bowls and sandwiches.
Mild & Kid-Friendly Microgreens 🥬
- Broccoli Microgreens:
Tender, mild, and extremely versatile. A perfect first microgreen for new indoor growers. - Kale Microgreens:
Fresh, mild, and forgiving. Great on soups, omelets, and bowls. - Swiss Chard Microgreens:
Gorgeous colorful stems with a soft, earthy flavor. Beautiful on the plate and easy to grow under lights. - Lettuce Microgreens:
Mild, tender, and extremely beginner-friendly. A perfect way to grow “mini salads” right on your countertop.
Herb Microgreens with Big Aroma 🌿
- Basil Microgreens:
Sweet, aromatic, and perfect for topping pizza, pasta, and caprese. - Cilantro Microgreens:
Bright, citrusy flavor that elevates tacos, salsas, and Asian-inspired dishes. - Oregano Microgreens:
Savory and bold—excellent on Italian dishes, roasted veggies, and flatbreads. - Anise Microgreens:
Light licorice flavor that works beautifully in salads, teas, and desserts.
Colorful & Gourmet Microgreens 🎨
- Amaranth Microgreens:
Vibrant red and pink stems with a delicate flavor. Stunning garnish for any dish. - Mesclun Microgreens:
A colorful mix of flavors and textures—great if you want variety in one tray. - What Is Mesclun Mix?:
Learn the classic mesclun blend and how to create your own mix for indoor trays.
Grain & Grass Microgreens 🌾
- Wheatgrass Microgreens:
The classic juicing green. Easy, quick, and grows thick and lush in trays. - Buckwheat Microgreens:
Tender, lemony greens that taste like delicate baby lettuce. - Popcorn (Corn Shoot) Microgreens:
Sweet, bright yellow shoots—fun, unusual, and great for indoor growers who want something different.
Sprout-Like & Clover-Style Microgreens 🍀
- Clover Microgreens:
Mild, crisp, and refreshing. Great in sandwiches and salads.
Leafy Greens, Baby Greens & Pea Shoots 🥗
Several of your guides blend microgreens with slightly larger indoor greens. These are great if you want a bigger harvest per tray.
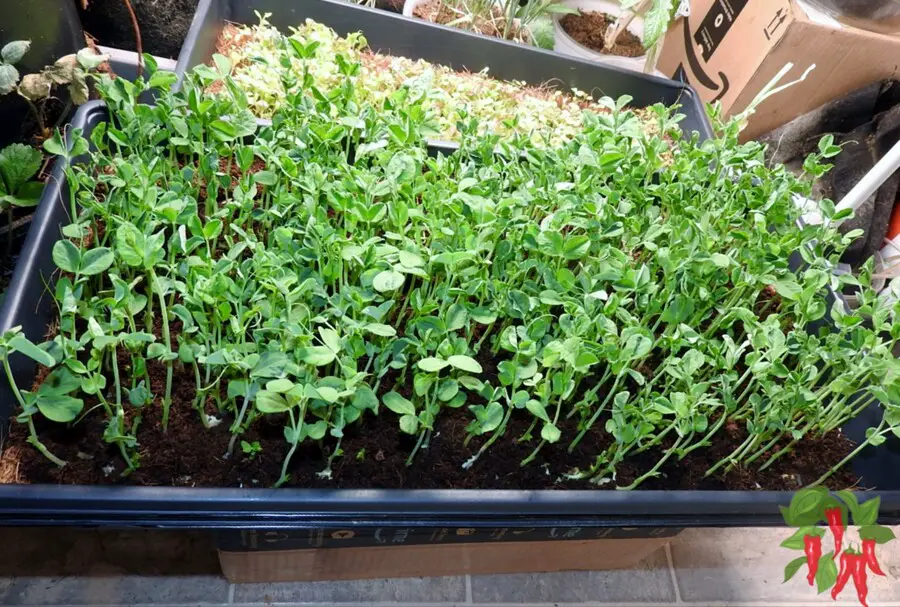
- Pea Shoots:
Crisp, sweet shoots that are delicious raw or lightly sautéed. - Growing Baby Spinach Indoors:
Tender baby leaves perfect for salads and stir-fries. - Introduction to Baby Greens:
A helpful overview if you want to explore indoor salad growing beyond microgreens. - Growing Baby Greens Indoors &
Growing Baby Greens in Containers:
Two detailed guides that help you turn tight indoor spaces into fresh salad gardens.
More Helpful Microgreen Resources 📚
These supporting articles help you dial in your setup so your microgreens grow faster, cleaner, and with less guesswork.
- Best Microgreen Trays:
Learn which tray sizes and styles work best for indoor growing. - Best Soil for Microgreens:
Compare different grow mediums and see which ones perform best indoors. - Coconut Coir for Microgreens:
A clean, low-mess option perfect for beginners and small spaces. - How to Store Microgreens:
Smart storage tips to keep your harvest fresh longer. - How Much Microgreens to Eat Per Day?:
A helpful guide for anyone adding microgreens to daily meals. - Can You Eat Microgreens Every Day?:
Insights into the benefits of eating microgreens regularly. - Are Sprouts and Microgreens the Same?:
A clear explanation of how sprouts differ from microgreens in taste, nutrition, and growing method. - Reasons to Grow Microgreens at Home:
A great motivator if you need a push to get started growing your own trays. - Growing Microgreens at Home:
Another excellent beginner-friendly overview to pair with this main pillar. - How to Grow Microgreens Indoors in Trays:
A clear, step-by-step tray-growing guide for beginners.
Common Beginner Problems (and How to Fix Them)
“My Microgreens Are Growing Mold”
A little fuzzy root hair at the base of stems can be normal, but true mold looks more like a gray or white web spreading across the surface.
- ✅ Improve airflow with a small fan on low.
- ✅ Avoid overwatering or leaving water pooled in the tray.
- ✅ Bottom-water instead of soaking the top of the tray.
- ✅ Don’t sow seeds so thickly that air can’t move between stems.
“My Microgreens Are Tall and Floppy”
Leggy microgreens are usually a sign of not enough light.
- ✅ Move trays closer to the window or grow light.
- ✅ Extend the light period to 12–16 hours per day.
- ✅ Make sure no objects are shading the tray.
“Why Are My Microgreens Yellow?”
Microgreens sprouted in darkness often start out pale or yellow.
Once they get a day or two of good light, they usually green up on their own.
- ✅ Give them more light and a bit of patience before you worry.
“The Surface Keeps Drying Out”
Small trays can dry quickly indoors, especially near heaters or in low humidity.
- ✅ Check moisture daily, especially during germination.
- ✅ Use a humidity dome for the first several days to slow evaporation.
- ✅ Try coco coir, which holds moisture more evenly than some mixes.
FAQs About Growing Microgreens Indoors
Do microgreens need direct sunlight?
Microgreens don’t have to be in direct sun, but they do need plenty of bright light.
A sunny windowsill or an inexpensive LED grow light a few inches above the tray works very well.
Can I grow microgreens without soil?
Yes. You can grow microgreens on coco or hemp mats, or in other soil-less media.
Just keep the mat evenly moist and be a bit more attentive to watering.
How often should I water microgreens?
Check them daily. Water whenever the medium starts to feel dry just below the surface.
Bottom-watering is ideal because it keeps foliage drier and helps reduce mold risk.
How long do microgreens take to grow indoors?
Most microgreens are ready to harvest 7–14 days after sowing, depending on the variety, temperature, and light.
Should I wash microgreens before eating them?
If you’ve grown them in a clean indoor setup and kept the foliage dry, many people simply brush off any loose bits and eat them.
If you do wash them, dry them thoroughly on a towel before storing so they stay crisp.
Do I need special seeds labeled “microgreens”?
Seeds sold specifically for microgreens are convenient, especially in larger quantities,
but you can also use many regular vegetable and herb seeds. Just avoid treated seeds meant for field planting.
Can I reuse my growing medium?
For most home setups, it’s simplest to compost the used medium and start fresh.
Reusing it can increase the risk of disease and uneven growth, especially in small indoor trays.
Conclusion
Growing microgreens indoors is one of the easiest ways to bring fresh, living food into your home year-round.
Once you’ve run a tray or two and figured out how your light and watering routine work together, it quickly becomes a habit—sow, grow, snip, repeat.
Start with one or two easy varieties, like radish or broccoli, and build from there.
Before long, you’ll have a rotation of trays giving you a steady harvest of colorful, flavorful greens,
all from a tiny space you barely noticed before.
References (.edu)
University of Minnesota Extension – Microgreens Growing Guide
University of Minnesota Extension – Mini Greens, Mega Benefits: Growing Microgreens at Home
Penn State Extension – Growing Microgreens
Penn State Extension – A Step-by-Step Guide for Growing Microgreens at Home
Utah State University Extension – Grow Your Own Microgreens
Clemson Cooperative Extension – Growing Microgreens
South Dakota State University Extension – Growing Microgreens at Home