How to Repot a Bonsai for Beginners is one of the most important skills you can learn as a bonsai grower. Repotting refreshes the soil, prevents roots from becoming crowded, and helps your tree continue growing in a healthy, controlled way.
Most bonsai trees need repotting every few years, but the process is easier than many new growers expect. With the right tools, proper timing, and a little patience, you can safely move your bonsai into fresh soil and give its roots room to thrive.
This step-by-step guide explains when to repot, how to prune roots, choose the right pot, and care for your bonsai after repotting.
What You’ll Learn 🌳
- 🪴 How to tell when a bonsai needs repotting
- ✂️ How to safely prune bonsai roots
- 🌱 Choosing the right bonsai soil mix
- 🏺 How to select a suitable bonsai pot
- 💧 Proper watering after repotting
- ⚠️ Common repotting mistakes to avoid
- 🌿 How to help your bonsai recover quickly
Quick Answer: How Do You Repot a Bonsai Tree?
To repot a bonsai tree, carefully remove it from its current pot, trim damaged or overcrowded roots, refresh the soil, and place the tree into a container with proper drainage. Water thoroughly and provide a sheltered location while the roots recover.
Most bonsai trees benefit from repotting every two to five years depending on the species, age, and growth rate of the tree.
An Introduction To How to Repot a Bonsai for Beginners
Hey there, fellow plant lovers! Welcome to our beginner’s guide on the captivating world of bonsai trees.
These miniature wonders require a bit of special care but don’t worry, we’ve got your back!
In this introduction, we’ll provide a brief overview of bonsai trees and their unique care requirements.
We’ll also discuss the importance of repotting for maintaining your bonsai’s health and growth.
Whether you’re a first-time bonsai owner or just looking for some helpful tips, we’re here to guide you on this exciting journey.
Let’s embark on this adventure and get our hands dirty!
Here is a helpful video showing how to repot a bonsai tree
Bonsai Basics: A Miniature World of Wonder
Bonsai trees are essentially miniature versions of their full-sized counterparts, carefully cultivated to remain small and manageable.
This ancient art form originated in China and Japan, where it has been practiced for centuries.
Bonsai trees require special care, including proper watering, pruning, and, of course, repotting.
By giving them the attention they deserve, you’ll be rewarded with a thriving, beautiful tree that adds a touch of nature to your home.
Repotting for Health and Happiness
Repotting plays a vital role in the overall health and growth of your bonsai tree.
As the roots grow and expand, they can become cramped and tangled, which can limit the tree’s ability to absorb nutrients and water.
Repotting not only refreshes the soil but also provides an opportunity to prune and reposition the roots, ensuring your bonsai stays healthy and vibrant.
Time for a Change: When to Repot
Knowing when to repot your bonsai tree is essential for its well-being. Generally, you should repot every 2-5 years, depending on the species and age of the tree.
Signs that your bonsai may need repotting include yellowing leaves, slower growth, or roots growing out of the drainage holes.
Repotting is typically done in late winter or early spring, but it’s essential to research the specific needs of your bonsai species for the best results.
Best Times to Repot Different Bonsai Trees
While late winter and early spring are the most common times to repot bonsai trees, the ideal timing can vary depending on the species.
Deciduous Bonsai
Japanese Maple, Chinese Elm, and other deciduous bonsai are often repotted just before spring growth begins.
Evergreen Bonsai
Many evergreen bonsai are repotted in early spring before active growth resumes.
Tropical Bonsai
Ficus and other tropical species can often be repotted during warm periods when they are actively growing.
Recently Purchased Bonsai
A newly purchased bonsai does not always require immediate repotting. Check for root crowding and poor soil conditions before making the move.
Essential Tools and Materials

Alright, friends, before we jump into the repotting process, it’s important to gather all the essential tools and materials we’ll need to get the job done right.
Think of it as assembling your very own bonsai care toolkit!
Having the right equipment on hand will make the entire process smoother, more efficient, and ultimately, more enjoyable.
So let’s take a look at what you’ll need to have by your side as we embark on this repotting adventure together.
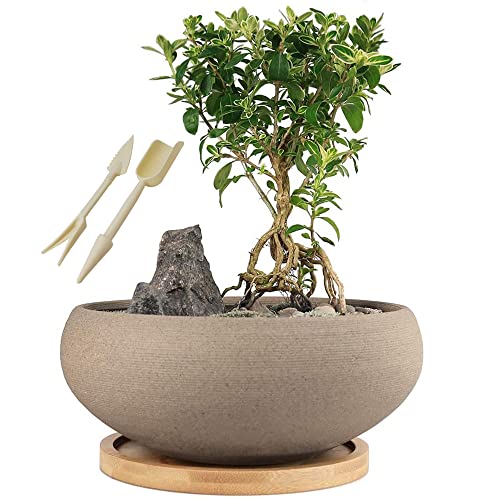
Bonsai Pot: Home Sweet Home
Selecting the right bonsai pot is crucial for your tree’s well-being.
Consider factors like size, shape, and material to ensure your bonsai has enough space to grow and breathe.
Ceramic pots are a popular choice for their durability and aesthetics, but be sure to choose one with adequate drainage holes to prevent root rot.
Bonsai Soil Mix: The Perfect Blend

A good bonsai soil mix is essential for proper drainage and nutrient retention.
Bonsai-specific mixes usually consist of organic and inorganic components, like akadama, pumice, lava rock, and pine bark.
You can purchase pre-mixed soil or create your own blend tailored to your tree’s specific needs.
Read Bonsai Soil Basics to learn how to create your own bonsai mix.
Root Pruning Shears: Snip, Snip

Root pruning shears are designed to trim the roots of your bonsai with precision and care.
These specialized shears ensure clean cuts without damaging the delicate roots, promoting healthy growth and minimizing stress on the tree.
Root Rake: Loosen Up

A root rake is a handy tool for gently loosening the soil around your bonsai’s roots. This allows you to remove the tree from its old pot with minimal damage, making the repotting process smoother and safer for your little tree friend.
Root Hook: Untangle with Ease

A root hook is designed to help you untangle and spread your bonsai’s roots during the repotting process. This tool allows you to work through the root ball with minimal harm, ensuring the roots are well-arranged and ready for their new home.
Drainage Mesh: Keep It Flowing

Drainage mesh is a simple but essential component for a healthy bonsai. Placed at the bottom of the pot, this mesh prevents soil from escaping while allowing excess water to drain, reducing the risk of root rot and other issues.
Wire (Optional): Secure and Steady
While not always necessary, wiring can provide added stability for your bonsai tree in its new pot. Aluminum or copper wire can be used to anchor the tree, ensuring it stays in place while the roots establish themselves.
Chopstick or Similar Tool: No Air Pockets Allowed
A chopstick or similar tool is perfect for removing air pockets in the soil while repotting. This ensures the soil is evenly distributed around the roots, promoting better water absorption and overall root health.
Watering Can or Hose: Quench the Thirst
Finally, a watering can or hose is essential for thoroughly watering your bonsai after repotting. Proper hydration is key to helping your tree adjust to its new environment and ensuring a smooth transition.
Preparing for Repotting
Now that we’ve got our trusty toolkit assembled, it’s time to prepare for the big repotting day!
A little planning and preparation can go a long way in making the process smoother and more enjoyable for both you and your bonsai buddy.
In this section, we’ll cover the key steps to take before diving into the repotting process, from choosing the right time of year to watering your bonsai the day before.
So let’s get ready to give your tree a fresh start and set the stage for a successful repotting experience!
Timing is Everything: Right Time for Your Bonsai Species
Choosing the right time of year to repot your bonsai is crucial for its well-being.
Most species are best repotted in late winter or early spring, just before the growing season begins.
However, it’s important to research the specific needs of your particular bonsai species, as some may have different requirements.
Proper timing will help minimize stress on your tree and promote a healthy recovery.
Pre-repotting Hydration: Watering Your Bonsai
Watering your bonsai thoroughly the day before repotting is an essential step.
This helps ensure the roots are well-hydrated and more flexible, making them easier to work with and less prone to damage during the repotting process.
So, give your tree a nice, deep drink to prepare it for the big day ahead!
Picking the Perfect Pot: Suitability and Drainage Mesh

See different bonsai pot options on Amazon
Selecting a suitable new pot for your bonsai is an important part of the preparation process.
Consider factors like size, shape, and material, ensuring that your tree has enough room to grow and thrive.
Don’t forget to prepare the drainage mesh as well! Cut a piece of mesh to fit over the drainage holes in the bottom of the pot, preventing soil from escaping while still allowing excess water to drain out.
This will help create a healthy environment for your bonsai’s roots.
Removing the Bonsai from its Old Pot
Alright, friends, it’s time to get down to business and start the repotting process!
The first step is carefully removing your bonsai from its old pot. This can be a delicate task, as we want to minimize any stress or damage to the tree’s roots.
But don’t worry, with patience and a gentle touch, we’ll guide you through the process step by step.
Let’s put on our plant-parent hats and get ready to help our bonsai tree transition to its new home!
Loosening the Soil: Gentle Root Rake Action
To start, use your root rake to gently loosen the soil around the edges of the pot. Be careful not to damage the roots as you work your way around the pot.
This step helps free the root ball from the container, making it easier to remove the tree without causing harm.
Lifting the Tree: Careful Hands Required
Once the soil is loosened, it’s time to carefully lift the tree out of its old pot.
Using both hands, grip the base of the trunk and gently wiggle the tree to release the roots.
Slowly lift the tree, taking care not to yank or pull too hard, as this can damage the root system. Patience is key here – take your time and treat your bonsai with care.
Root Inspection: Cleaning and Checking
With your bonsai tree out of its pot, now is the perfect time to clean the roots and inspect them for any issues.
Gently remove excess soil from the roots using your fingers or a soft brush. Look for any signs of rot, pests, or disease, and address any problems accordingly.
A healthy root system is the foundation of a thriving bonsai, so take the time to ensure everything is in tip-top shape.
Pruning and Preparing the Roots
Now that we’ve successfully removed our bonsai tree from its old pot, it’s time to give the roots a little TLC.
Pruning and preparing the roots is an essential part of the repotting process, as it encourages healthy growth and ensures the tree can absorb nutrients effectively.
Don’t worry if you’re new to this – we’re here to guide you through the process, so your bonsai will be well on its way to a happy, healthy future.
Let’s grab those root-pruning shears and get ready for some bonsai pampering!
Root Makeover: Trimming Long, Thick, or Damaged Roots
Begin by using your root pruning shears to trim any overly long, thick, or damaged roots.
Focus on removing dead or unhealthy roots, as well as any that are excessively large or tangled.
This helps create a more balanced root system, allowing your bonsai to absorb water and nutrients more effectively, promoting healthy growth.
Untangling the Tangles: Spreading Roots with a Root Hook
Next, it’s time to gently untangle and spread the roots using your root hook.
Carefully work through the root ball, separating any tangled roots and spreading them out evenly.
This step not only makes it easier to fit the roots into the new pot but also ensures they have plenty of space to grow and access nutrients.
Comfy Roots: Ensuring a Good Fit in the New Pot
Lastly, before placing your bonsai in its new pot, make sure the roots fit comfortably.
If necessary, trim or rearrange the roots to ensure they can spread out evenly without being cramped or crowded.
Giving your bonsai roots the space they need to grow will contribute to a happy, healthy tree in its new home.
Potting the Bonsai in its New Home
The moment we’ve been working towards is finally here – it’s time to pot your bonsai in its new home!
With the roots all pruned and prepared, we can now focus on creating the perfect environment for your tree to thrive.
In this section, we’ll guide you through the steps of placing your bonsai in its new pot and setting it up for success.
So let’s put on our gardening gloves and get ready to welcome your bonsai to its fresh new space!
Soil Foundation: Laying Down a Layer of Bonsai Soil Mix
Place your drainage mesh in the bottom of the empty pot. Then start by adding a layer of bonsai soil mix on top of it and into the bottom of the new pot.
This creates a base for the roots to rest on and ensures they have access to the nutrients they need.
Be sure to use a high-quality soil mix designed specifically for bonsai to promote proper drainage and nutrient retention.
Positioning Your Tree: Aesthetics and Growth Direction
Next, carefully position your bonsai tree in the new pot.
Take into consideration the aesthetics of the tree, including the angle and direction of the trunk, as well as the growth direction of the branches.
Ensure the tree is centered and upright, with the most attractive side facing forward, creating a visually appealing and balanced look.
Soil Time: Filling in the Pot and Removing Air Pockets
Now it’s time to fill in the pot with more bonsai soil mix.
Gently add soil around the roots, ensuring they are well-covered and supported.
Use a chopstick or similar tool to carefully remove any air pockets and ensure the soil is evenly distributed.
This step is crucial for proper water absorption and root health.
Optional: Wiring for Stability
If your bonsai tree needs some extra stability in its new pot, you can use wire to secure it in place.
Thread a piece of aluminum or copper wire through the drainage holes and carefully wrap it around the root ball, taking care not to damage the roots.
Tighten the wire gently to anchor the tree, ensuring it stays in place while the roots establish themselves in their new home.
When to remove the wiring
It’s essential to keep an eye on the wiring as your bonsai tree continues to grow.
Generally, you should remove the wiring after the tree has become stable in its new pot and the roots have had enough time to establish themselves.
This can typically take anywhere from a few months to a year, depending on the species and growth rate of your bonsai.
Be cautious not to leave the wiring on for too long, as it can cause damage to the tree by cutting into the bark and constricting growth.
Check the wired areas periodically and remove the wiring as soon as you notice it beginning to dig into the bark or if the tree appears stable enough without the extra support.
To remove the wiring, carefully unwrap it or use wire cutters, taking care not to damage the roots or branches in the process.
How do you remove it if it is covered with soil
If the wiring is covered with soil, you’ll need to carefully expose the area where the wire is located before removing it. Follow these steps to safely remove the wire:
Gently move the soil aside: Using a chopstick, small trowel, or your fingers, carefully push the soil away from the area where the wire is located.
Be gentle to avoid damaging the roots.
Locate the wire: Once you’ve exposed the area, identify the path of the wire and how it’s wrapped around the root ball or secured to the pot.
Cut the wire: If necessary, use wire cutters to carefully snip the wire in a few strategic spots to make it easier to remove. Be cautious not to cut any roots in the process.
Unwrap the wire: Carefully unwrap the wire from around the roots or pot, using your fingers or a pair of needle-nose pliers if needed.
Take your time and be gentle to avoid causing any damage.
Replace the soil: After you’ve successfully removed the wire, gently replace the soil around the roots, ensuring they are well-covered and supported.
Remember to monitor your bonsai’s stability after removing the wire, and provide any necessary support or adjustments to its positioning in the pot.
Post-repotting Care
Great job! Your bonsai is now happily settled in its new pot, but our work doesn’t end here.
Providing the right post-repotting care is essential for helping your tree adjust and recover from the process.
In this section, we’ll discuss the steps you should take to ensure your bonsai thrives in its new home, from watering and fertilizing to protecting it from harsh conditions.
So let’s continue being the best plant parents we can be and support our little tree’s growth journey!
Quenching the Thirst: Watering Your Bonsai
Immediately after repotting, water your bonsai thoroughly to ensure the soil is evenly moist.
Use a watering can or hose with a gentle spray to avoid disturbing the soil or roots.
Proper hydration is essential for helping your tree adjust to its new environment and recover from the repotting process.
Shelter from the Storm: Shaded Location for Recovery
For the first few weeks after repotting, keep your bonsai in a sheltered, shaded location.
This helps protect the tree from direct sunlight, strong winds, and other harsh conditions, allowing it to recover and establish its roots in a more stable environment.
Remember, your bonsai has just gone through a significant change, so giving it some time to adjust is crucial.
Health Watch: Monitoring and Adjusting Care
Finally, keep a close eye on your bonsai’s health during the post-repotting period.
Monitor the tree for any signs of stress or issues, such as yellowing leaves or wilting, and adjust your care routine as necessary.
Pay attention to its watering needs, and hold off on fertilizing for a few weeks to give the roots time to recover.
With careful observation and proper care, your bonsai will soon be thriving in its new home.
Common Bonsai Repotting Mistakes
Most bonsai trees recover well after repotting, but a few common mistakes can slow growth or stress the tree. Avoiding these issues will help your bonsai establish itself more quickly.
Repotting at the Wrong Time
Repotting during periods of active summer growth or environmental stress can make recovery more difficult.
Removing Too Many Roots
Root pruning is important, but removing too much of the root system at once can weaken the tree.
Using Regular Potting Soil
Heavy potting mixes often stay too wet for bonsai trees. Bonsai soil provides much better drainage and aeration.
Fertilizing Too Soon
Freshly repotted bonsai trees should be allowed time to recover before fertilizer is applied.
Repotting Bonsai FAQs
How often should a bonsai tree be repotted?
Most bonsai trees are repotted every two to five years depending on their age, species, and root growth.
Can I use regular potting soil for bonsai?
Bonsai trees perform best in specialized bonsai soil mixes that provide proper drainage and aeration.
Do I always need a larger pot when repotting?
No. Many bonsai trees are returned to the same pot after root pruning, depending on their stage of development.
Should I fertilize immediately after repotting?
Most growers wait several weeks before fertilizing to allow the roots time to recover.
What is the biggest mistake beginners make when repotting bonsai?
Removing too many roots or repotting at the wrong time of year are two of the most common mistakes.
How to Repot a Bonsai for Beginners Final Thoughts
Repotting is one of the most important parts of bonsai care. It refreshes the soil, supports healthy root growth, and helps your tree remain vigorous for years to come.
Although the process may seem complicated at first, following a simple step-by-step approach makes it much easier. With practice, repotting becomes a routine part of maintaining a healthy bonsai tree.
By choosing the right soil, pruning roots carefully, and providing proper aftercare, you’ll give your bonsai the best possible start in its new container.
Remember, everyone starts somewhere, and with patience, practice, and a little bit of love, you’ll master the art of bonsai repotting in no time.