
What is a Grobucket Self-Watering Planter?
Explore the ease and efficiency of the GroBucket Garden Kit! Transform any 5-gallon bucket into a thriving garden space, perfect for any home gardener.
What You’ll Learn with the GroBucket Garden Kit 🌱
- How the GroBucket turns a regular 5-gallon bucket into a self-watering SIP planter.
- Exactly how to drill, set up, and transplant into your GroBucket for a trouble-free start.
- Why coco coir works so well in GroBuckets and how to prime it with CalMag.
- Simple fertilizer and watering routines that keep plants fed without overdoing it.
- Real-world tips from my grow journal on how often to fill the reservoir and what to expect.
- Which herbs, veggies, and small trees thrive in GroBuckets indoors and out.
GroBucket Garden Kit – Easy Self Watering Bucket Insert
Are you ready to revolutionize your gardening experience? The GroBucket Garden Kit offers an innovative solution, turning any standard 5-gallon bucket into a self-watering planter.
Ideal for urban gardeners, busy plant enthusiasts, or anyone looking to simplify their green routine, the GroBucket is your ticket to a hassle-free, lush garden.
GroBucket Self Watering Planter Overview
The GroBucket Garden Kit from GroTech Garden Products lets you use the GroBucket insert to quickly convert a 5-gallon bucket into a self-watering planter.
You can use it as a container garden for indoor plants or outdoors on the patio. It’s easy to move from sun to shade, or even bring inside when the weather turns cold to extend your growing season.
This self-watering container makes it easy to take care of your plants. With its water reservoir and water-level indicator, you always know when it’s time to fill up—no more guessing or daily watering.
The GroBucket works by capillary movement from bottom to top in all weather conditions and for almost any type of plant. Once filled correctly, it keeps roots consistently moist without drowning them.
")
My Honest GroBucket Review
I actually own the GroBucket inserts and have been using them to grow tomatoes and peppers. I can truthfully say they work.
I’ve used them over multiple seasons, and they’ve held up well. Time to update my review because there have been a few changes over the years.
Self-watering planters are also called SIPs (sub-irrigated planters), which I think is more accurate—these planters are “self-watering” until the reservoir runs out. But if you’re tired of guessing when to water or having to water every day, you need to try a GroBucket garden kit.
Improved Water Level Indicator & Design Tweaks
The only problem I initially had was that the original water-level indicators were made out of wood, and after a couple of years some of them rotted.
The newer kits have upgraded indicators and a widened fill spout, plus a label holder. It’s always a good sign when a company improves a product instead of just pumping out the same old thing.
On Amazon, the GroBucket has a very solid rating and hundreds of positive reviews, which matches my own experience. If you’re into container gardening, it’s an easy win.
What Is a GroBucket Kit?
The GroBucket kit is used to turn a 5-gallon bucket into a sub-irrigated planter (self-watering planter). The kit contains the insert, a feed tube, and a water-level indicator.
")
You provide the buckets and drill a single drain hole in each one. GroBucket kits come in 3- and 10-bucket packs, so you can scale up fast if you like how they work.
The insert forms a reservoir under your plant. You fill in around the insert with growing media, then add more above and plant into it. Wicking action pulls water up to the roots, so plants are never over or underwatered when you use it correctly.
You can use coco coir, peat-based mixes, or other soilless media—but never use garden soil in a GroBucket. It compacts, wicks poorly, and can bring in pests and diseases.

GroBucket Setup & Unboxing (Step by Step)
When my kit arrived, the box was smaller than I expected—but everything that mattered was inside. Each insert, feed tube, and indicator was present and in good shape.
Step 1 – Drill the Drain Hole
Setup really couldn’t be easier. The first thing you need to do is drill the drain hole in your buckets.
- Measure 3½ inches up from the bottom of the bucket.
- Drill a 5/16-inch hole at that height. A bit larger or smaller is fine, but the height is critical.
Too low and your reservoir won’t hold enough water; too high and the bucket will stay overfull. You want the hole just below the top of the insert’s internal reservoir.
If you don’t have a drill, you can carefully heat and poke a hole with a nail or knife, then twist it to round it out—but the drill is better.
Step 2 – Install the Insert & Feed Tube
Drop the GroBucket insert into the bucket and push the feed tube firmly into its socket. Make sure it fits snugly; you don’t want it popping loose once the bucket is full of media.
Step 3 – Choose and Pack Your “Soil”
The best choice for your GroBucket is coco coir, but you can use a peat-based potting mix if that’s what you have. Try to avoid mixes with tons of perlite or big bark chunks right around the insert—too many air pockets will interfere with wicking.

Pack the coco or potting mix firmly around the insert. There’s a slight lip on the bottom of the insert to keep media out of the reservoir. You want good contact between the media and the wicking area so water can move upward easily.
If you want to add soil amendments like worm castings, mix them into the upper portion of the bucket where roots will access them quickly.
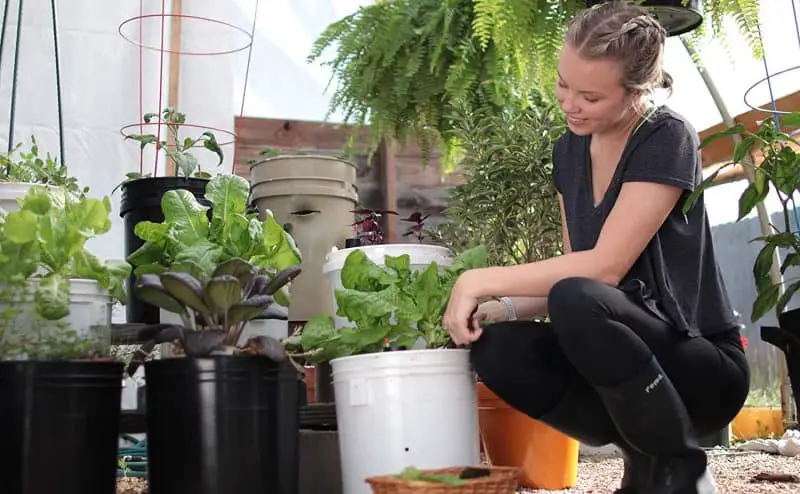
Step 4 – Transplant Into the GroBucket

Set your transplants in place and adjust the fill level so the root ball sits a couple of inches below the bucket rim. You don’t want to fill the bucket all the way to the top; leave room for watering and mulch.
If your tomatoes are leggy, you can bury the stems deeper—they’ll root along the buried portion. For healthy, compact plants, set the top of the root ball about an inch below the final soil line.
How I Like to Transplant
I like to fill the bucket to the height I want, then either:
- Make a hole with my hand, or
- Press the transplant pot itself into the media to make a perfectly sized hole.
Then I pop the plant out of its pot, drop it into the hole, and firm the media around it to remove air pockets.
Step 5 – First Watering (From the Top)
The first week, you’ll water from the top. The goal is to:
- Thoroughly moisten the media so it will wick properly.
- Help the roots settle in and start growing downward.
Water slowly until it runs out of the drain hole—then you know the reservoir is full. After that first week, you’ll switch to using the feed tube almost exclusively.
GroBucket Fertilizer & Watering Tips
Once your plants are established, you’ll water and feed through the fill tube. This keeps the foliage dry, reduces fungal issues, and uses the SIP design the way it was meant to be used.
The GroBucket instructions recommend watering from the top only at the beginning. After that, it’s all about the reservoir and the feed tube.
Because water is always wicking up, your plants are essentially eating constantly. That means you can feed at a lower strength than you might in a traditional top-watered container.
If you have a TDS meter and pH pen, here’s what I like to do:
- Seedlings: around 300 ppm once they have true leaves.
- Transplants / medium plants: about 600 ppm.
- Established, flowering plants: 800–1000 ppm.
If you don’t want to measure, start with about half the manufacturer’s recommended strength and watch your plants.
- Very dark green, clawed leaves = likely overfed.
- Pale, yellowing leaves (with enough light) = likely underfed or missing key nutrients.
GroBucket Soil or Coco – Which Is Best?
")
You can use either coco coir or peat-based potting mixes, but coco has some big advantages in a sub-irrigated planter like this:
- Better wicking than peat-based mixes.
- Holds more air even when wet.
- Doesn’t compact as badly over time.
Technically, coco coir is a hydroponic medium. It’s basically inert and provides very little nutrition on its own, so it must be fed. It also likes to stay evenly moist, which makes it a perfect match for the GroBucket.
How to Use Coco Coir in a GroBucket
Coco isn’t soil and shouldn’t be treated like it.
I like to use Canna coco bricks. Bricks are bone-dry and bug-free, easy to carry and store. You just throw them in a bucket with water and CalMag and they swell up.
A brick makes about 5 gallons of coco and soaks up around 3 gallons of water. I always “prime” my coco:
- Add about 300 ppm of calcium and magnesium (CalMag) to the soak water.
- Let the bricks fully expand and break them apart.
I use CaliMagic from General Hydroponics to pre-charge my coco. There are other brands, but that one has worked great for me.
Important rules for coco:
- Always add some nutrients every time you water.
- Don’t let coco dry out completely.
- Treat it like hydroponics, not potting soil.
Feeding Your Coco – Don’t Forget CalMag
Coco holds onto certain nutrients more than others, especially calcium and magnesium. That’s why priming with CalMag is so important.
If your tap water is very soft (like mine at ~30 ppm), you’ll need to supply extra minerals. With harder water, you might be able to get away with less.
Magnesium is at the center of the chlorophyll molecule, so when plants get short on it, you’ll see yellowing between veins and curling on newer leaves.
I use CalMag during veg and then switch more toward magnesium sulfate (Epsom salt) when plants are in flower or fruiting to avoid too much nitrogen from the CalMag formula.
For flowering and fruiting plants like tomatoes and peppers, I like a bloom formula such as Jack’s Classic Bloom Booster 10-30-20. You want lower nitrogen and higher phosphorus and potassium at that stage.

You can use Miracle-Gro if you want, but the ingredients aren’t as good. For SIPs and coco, I prefer something formulated more like commercial greenhouse nutrients.
A Bit About Fertilizer & Organics in GroBuckets
I grew organic vegetables back in the 70s when that was considered “lunatic fringe,” so I’m not anti-organic at all. But in a small, warm reservoir of standing water, organic nutrients can be risky.
As that water warms up, organic matter becomes food for bacteria and water molds like Pythium and Phytophthora. Coco is somewhat resistant thanks to beneficial Trichoderma, but high temperatures and stagnant, organic-rich water can still spell trouble.
Mineral (synthetic) nutrients don’t feed bad microbes the same way, so they’re usually a better fit for a system like the GroBucket.
To help keep the reservoir clean and oxygenated, I like to use a little 3% hydrogen peroxide:
- About 1 teaspoon per gallon of 3% H₂O₂ down the feed tube every few days in hot weather.
It kills off problem microbes and releases extra oxygen into the root zone. You might even see a little growth spurt after using it.
Real-World Grow Journal: GroBuckets in Skagit Valley
I live in the Skagit Valley—yes, where the tulips are. It’s beautiful, but not exactly a tomato and pepper paradise. Summers are mild, nights are cool, and heat-loving crops can struggle to ripen.
I set up three GroBuckets with coco and CalMag, then planted:
- Two peppers (one green, one red)
- One bush tomato
The plants were late-season leftovers from a local garden center—overwatered, shaded, and sadly abused. Definitely not perfect starts, which makes this a good real-world test.
Early Days & Weather Challenges
The weather was cool, gray, and wet for the first couple of weeks. Even so, the plants settled in, the reservoirs held moisture nicely, and I didn’t have to top up very often.
Once the weather finally warmed up, I started to get a much better sense of how often the GroBuckets needed filling. At peak growth, they were emptying a full reservoir every 2–3 days.
Day 28 – Tomatoes and Peppers Taking Off
By around day 28, I had visible tomatoes and peppers setting, even with the late start and cool summer. Reservoirs were being refilled every 3 days or so, which gives you plenty of wiggle room if you miss a day.
I did need to add CalMag again when I saw some deficiency signs in the peppers (curled, deformed new leaves), which is very common in coco. After one feeding, the new growth looked much better.
First Harvest & Ongoing Performance
Around day 30–40, I started picking peppers and watching Roma tomatoes turn color. All of this from beat-up transplants in a less-than-ideal climate.
By the time fall started sneaking in, I was pretty sold on the system. The only real pests that annoyed me were earwigs chewing holes in pepper leaves—but that’s not the GroBucket’s fault.
Take Your GroBucket Indoors
One of my favorite things about this setup is that you can grow in it indoors too. Just set the bucket into a large plant tray to catch any overflow.
GroBuckets work great for:
- Citrus trees
- Avocado or coffee plants
- Decorative houseplants that like steady moisture
Grow frost-tender plants outside in summer, then bring them indoors for winter without repotting. Add a grow light for sun-lovers like tomatoes and peppers, or tuck shade-tolerant plants near a bright window.
What Can You Grow in a GroBucket?

You can grow just about anything that fits in a 5-gallon container, including:
- Tomatoes, peppers, and eggplant
- Strawberries and bush beans
- Herbs like basil, parsley, and mint
- Dwarf citrus, figs, or other small trees
You can even dress up the buckets with spray paint or slip them into decorative outer containers if you don’t love the “plain bucket” look.
GroBucket FAQs
Here are some of the most common questions I get (or had myself) about using the GroBucket Garden Kit, all in one place.
Q: What is the GroBucket Garden Kit?
A: It’s an insert system that converts any standard 5-gallon bucket into a self-watering, sub-irrigated planter. The insert, feed tube, and indicator create a reservoir at the bottom so water wicks up to the roots.
Q: How do I set up a self-watering 5-gallon bucket?
A: Drill a drain hole 3½ inches up from the bottom, drop in the GroBucket insert, attach the feed tube, and fill with coco or potting mix. Water from the top the first time until it drains out the hole, then switch to watering through the tube.
Q: Can I use coco coir with the GroBucket?
A: Yes—coco coir is one of the best choices for a GroBucket. It wicks very well and holds air even when wet. Just remember that coco is inert and needs to be pre-charged with calcium and magnesium, then fed regularly.
Q: Is the GroBucket good for indoor use?
A: Absolutely. Just sit the bucket in a tray to catch any overflow from the drain hole. With a decent grow light, you can keep peppers, herbs, or even dwarf citrus going indoors through winter.
Q: How often do I need to fill the reservoir?
A: It depends on plant size, temperature, and wind. In my cool, coastal climate, established plants usually emptied the reservoir every 2–3 days in midsummer. In hotter, drier areas, you might need to top up more often.
Q: Are self-watering planters like GroBuckets good for plants?
A: Yes. They take the guesswork out of watering and prevent both over- and underwatering. Bottom watering also keeps foliage dry, which helps reduce fungal leaf diseases.
Q: Do self-watering planters need drainage holes?
A: They don’t have traditional bottom drain holes, but they do have a small side weep hole (like the one you drill in the bucket) to prevent overfilling the reservoir.
Q: Can I use organic fertilizer in a GroBucket?
A: You can, but I don’t recommend it in the reservoir. Warm, stagnant water plus organic matter is a recipe for root diseases. If you want to use organics, keep them in the top layer of the media and still consider a mineral base feed in the reservoir.
Q: What types of plants do best in a GroBucket?
A: Anything that likes consistent moisture and has enough root room for a 5-gallon container: tomatoes, peppers, bush beans, cucumbers, dwarf fruit trees, and bigger herbs like basil all do great.
Why I Like the GroBucket Garden Kit
All in all, I really like the GroBucket self-watering planter system. It grows strong, productive plants and makes watering almost foolproof. The built-in reservoir is a big help in hot weather, and the system plays especially well with coco coir and mineral nutrients.
If you want a low-stress way to grow tomatoes, peppers, herbs, or even a small citrus tree—indoors or out—the GroBucket is hard to beat.
GroBucket GroTech Garden Self Watering Planter Insert
")
GroBucket Garden Kit Key Takeaways:
- The GroBucket Garden Kit transforms a regular 5-gallon bucket into a self-watering, sub-irrigated planter.
- It uses a wicking system and built-in reservoir to deliver consistent moisture from the bottom up.
- Perfect for tomatoes, peppers, herbs, and even small trees, it’s an ideal solution for space-saving, low-maintenance gardening.
There’s even a Facebook group dedicated to the GroBucket system if you want to see what other gardeners are doing with it: https://www.facebook.com/GroBucket/
Self Watering Planters: Grow Amazing Plants with Less Effort