This post may contain affiliate links. If you buy something from one of our links we may earn a commission. Thanks
🍅 Hydroponics for Beginners: How to Grow Vegetables Indoors Without Soil
🥬 Welcome — Let’s Grow Fresh Vegetables Indoors the Easy Way
🌿 What You’ll Learn in This Guide
- 💧 How hydroponics works in simple, beginner-friendly terms
- 🥬 The easiest vegetables to grow indoors for quick harvests
- ⚙️ Which hydroponic systems are actually beginner-friendly
- 🪴 Why coco coir is a perfect “hydroponic soil” for vegetables
- 💦 How top-feed drip systems help peppers and tomatoes thrive
- 🔆 How much light your indoor vegetable garden really needs
- 🧪 Basics of nutrients, pH, and EC without getting overwhelmed
- ❌ Common mistakes new growers make—and how to avoid them
- 💵 Budget-friendly setup ideas so you can start small and expand
🌿 Why Hydroponics for Vegetables Indoors?
If you’ve ever wished you could step into your kitchen and grab fresh lettuce, herbs, or greens you grew yourself, hydroponics is your new best friend.
With Hydroponics for Beginners, you’re not trying to build a commercial farm—you’re learning simple ways to grow real food indoors, in a small space, without dealing with garden beds or outdoor weather.
🥕 No Garden? No Problem.
Maybe you live in an apartment, have a shady yard, or just don’t want to fight with bugs and clay soil. Hydroponics lets you:
- Grow vegetables indoors all year long
- Skip digging, weeding, and hauling bags of soil
- Keep everything clean, contained, and easy to manage
⚡ Faster Growth, Less Guesswork
Because hydroponic systems deliver nutrients directly to the roots, plants grow faster and more consistently than they do in most pots of soil.
Once you understand the basics—light, nutrients, and water—you’ll be surprised how quickly you can go from seedling to harvest.
😊 Designed for Beginners
You don’t need to be “handy,” scientific, or naturally gifted with plants. In this guide, we’ll stick to simple systems, clear explanations, and practical steps you can follow even if you’ve never grown anything before.
1. What Hydroponics Actually Is (Beginner Explanation)
Hydroponics sounds complicated, but at its core it’s very simple: you’re growing plants without soil. Instead of roots searching through dirt to find food and water, you:
- Provide water mixed with nutrients directly to the roots
- Make sure the roots get enough oxygen
- Give the plants consistent light and stable temperatures
That’s really it. You’re creating a controlled environment where vegetables get everything they need without wasting energy. Because of that, they can grow faster, stay healthier, and produce better yields than many soil-grown plants—especially indoors.
💧 Water + Nutrients + Oxygen = Happy Roots
In hydroponics, roots are either suspended in water, briefly flooded with water, or sitting in a soilless medium like coco coir while nutrient solution flows through. In every case, you’re trying to balance two things:
- Moisture and nutrients so the plant never goes thirsty
- Oxygen so roots don’t suffocate or rot
Once you understand that balance, everything else becomes much easier to figure out.
2. Why Hydroponics Works So Well for Vegetables
You can grow houseplants hydroponically, but hydroponics really shines when you grow vegetables and herbs. Here’s why it’s such a good fit:
- ⚡ Fast growth: Leafy greens and herbs can reach harvest size in just a few weeks.
- 🥬 Continuous harvests: Many hydroponic veggies can be “cut and come again.”
- 🚫 Fewer pests: No garden soil means fewer fungus gnats and soil-borne problems.
- 🏠 Small-space friendly: Great for apartments, condos, and rentals.
- 🧼 Clean and contained: No muddy boots, no spilled potting mix.
If you care more about salads, herbs, and stir-fry ingredients than flowers and shrubs, hydroponics fits your goals perfectly.
3. The Easiest Hydroponic Systems for Beginners
You don’t have to build a complicated system with miles of tubing. Here are the simple, reliable options that beginners succeed with most often.
🥤 A. Kratky Method (No Pumps, No Electricity)
The Kratky method is about as simple as hydroponics gets. You fill a container with nutrient solution, place a net cup with a seedling in the lid, and let the plant grow as it slowly drinks the water. As the water level drops, an air gap forms, giving roots access to oxygen.
Best for:
- Lettuce
- Spinach
- Bok choy
- Arugula
- Fast-growing herbs
🪣 B. Deep Water Culture (DWC)
In a DWC system, plant roots grow in a bucket or tub filled with nutrient solution, and an air stone keeps the water oxygenated.
It’s still a simple system, but the added air allows for faster growth and larger plants than Kratky in many cases.
Best for:
- Tomatoes
- Peppers
- Other large vegetable plants
🧵 C. Wick Systems
A wick system uses absorbent wicks to pull nutrient solution from a reservoir into the growing medium. There are no pumps, timers, or air stones to worry about.
Best for:
- Smaller herbs
- Baby greens
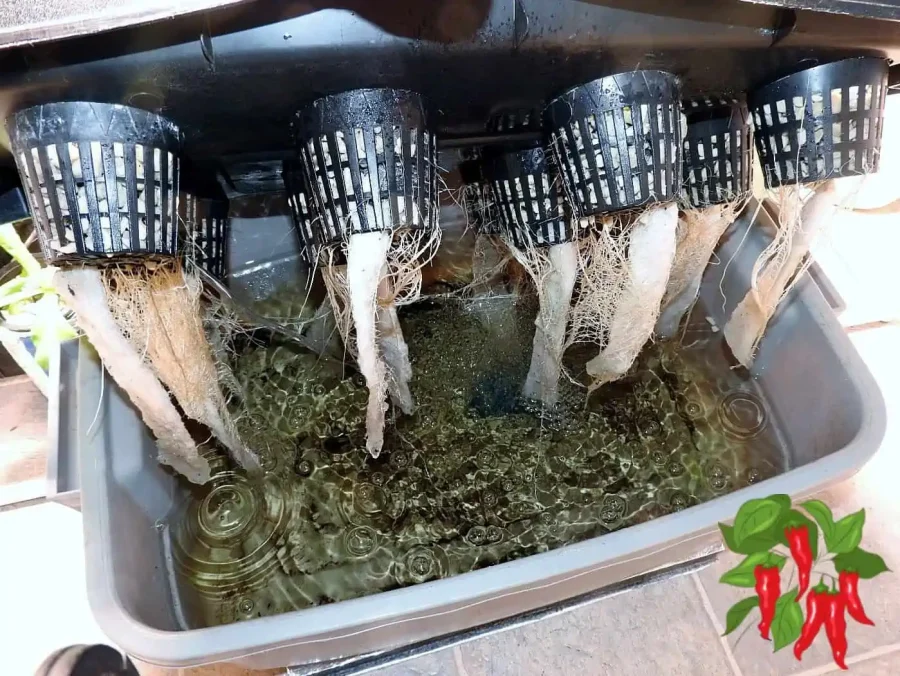
🌊 D. Ebb & Flow (Flood and Drain)
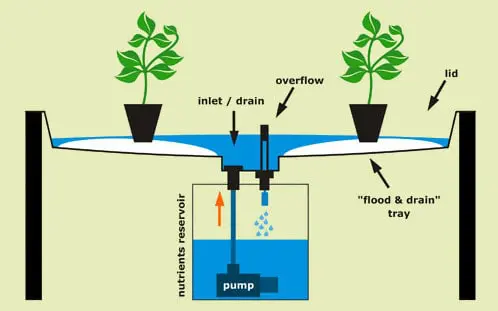
An ebb & flow system periodically floods a tray of plants with nutrient solution and then drains it back into a reservoir.
This gives roots a cycle of moisture and oxygen, which many vegetables love.
Best for:
- Mixed trays of leafy greens
- Herbs
- Some compact fruiting plants if the tray is deep enough
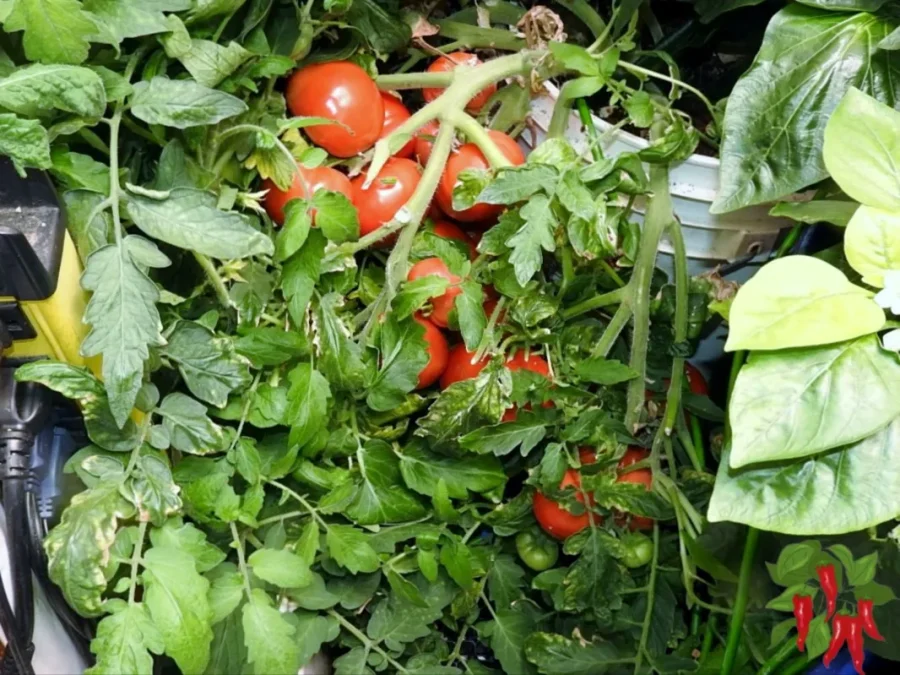
💦 E. Top-Feed Drip Systems (Vegetable Powerhouse)

In a top-feed drip system, nutrient solution is pumped from a reservoir and dripped onto the base of each plant, usually into a medium like coco coir.
The excess drains back into the reservoir, and the process repeats on a timer.
This is one of the best systems for indoor vegetables because:
- It keeps coco coir evenly moist but well-aerated
- It works beautifully for larger, hungrier plants
- It’s easy to automate with a simple timer
Best for:
- Peppers (sweet and hot)
- Determinate tomatoes
- Compact cucumbers
- Larger heads of lettuce and greens
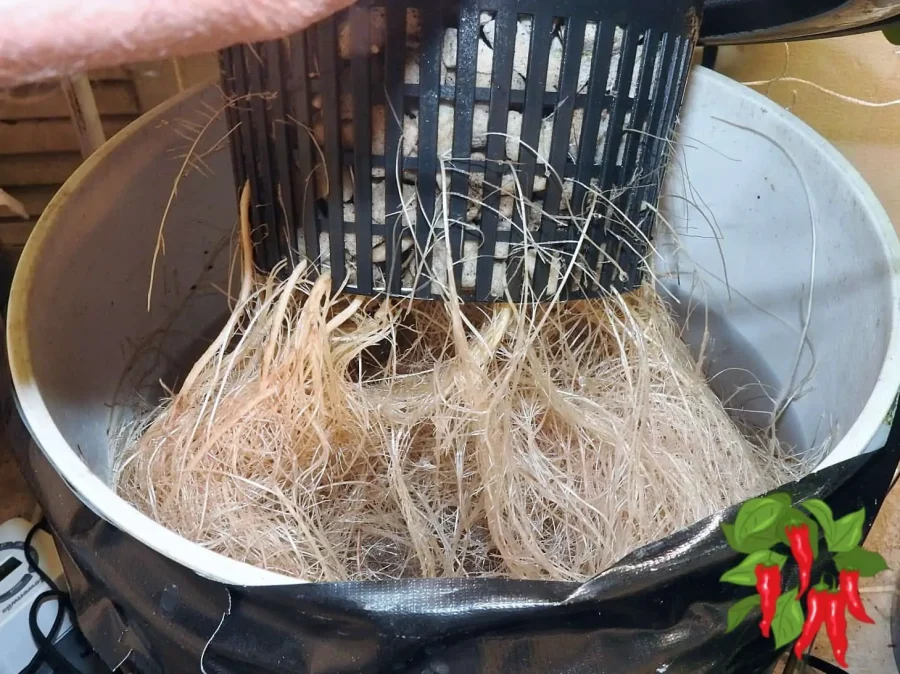
4. Hydroponic Growing Media: Why Coco Coir Shines
Hydroponics doesn’t always mean “roots dangling in water.” Many systems use a growing medium to support roots and hold moisture while nutrients pass through.
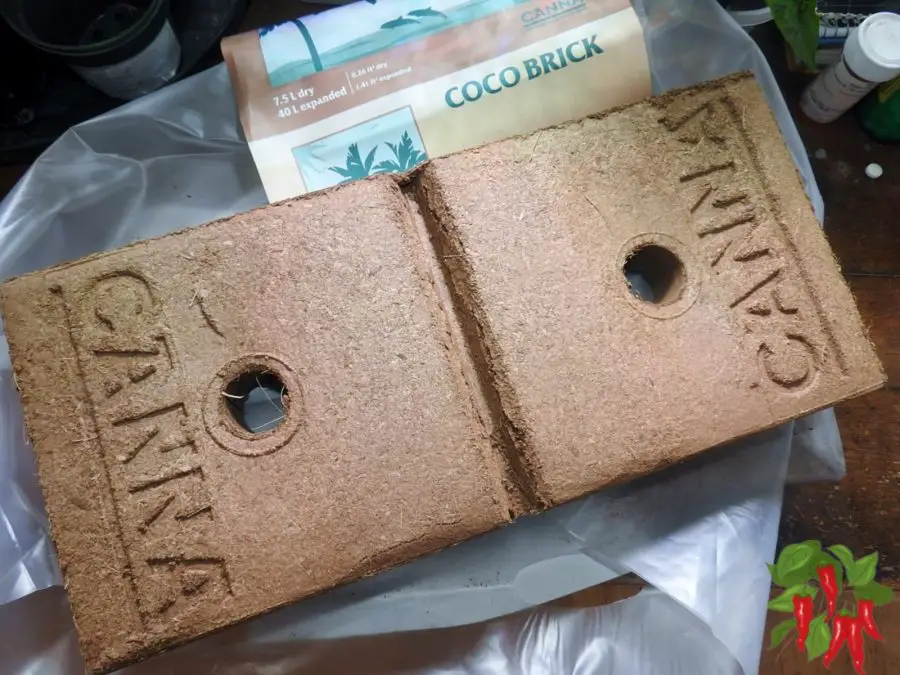
🪴 Coco Coir (Top Pick for Beginners)
Coco coir is made from coconut husks and behaves like a fluffy, airy version of soil—without the downsides. It holds water well but still allows plenty of oxygen to reach the roots.
Benefits of coco coir for indoor vegetables:
- Excellent moisture retention without becoming soggy
- Great root aeration for strong, healthy plants
- Lightweight and easy to handle indoors
- Renewable and more sustainable than peat-based mixes
- Pairs perfectly with drip systems and autopot-style setups
You can use straight coco coir or mix it with perlite for extra drainage. Either way, it’s one of the easiest stepping stones from traditional container gardening into true hydroponic growing.
Other Common Hydroponic Media
- Clay pebbles (LECA): Great for DWC and drip systems, often used in net pots.
- Rockwool: Excellent for starting seeds and transplanting into larger systems.
- Perlite: Often mixed with coco for extra aeration.
- Coco grow mats: Ideal for microgreens and baby greens trays.
5. Best Vegetables to Grow Indoors with Hydroponics
You can grow a lot of things indoors, but some vegetables are much easier and faster than others. Here’s where to start.
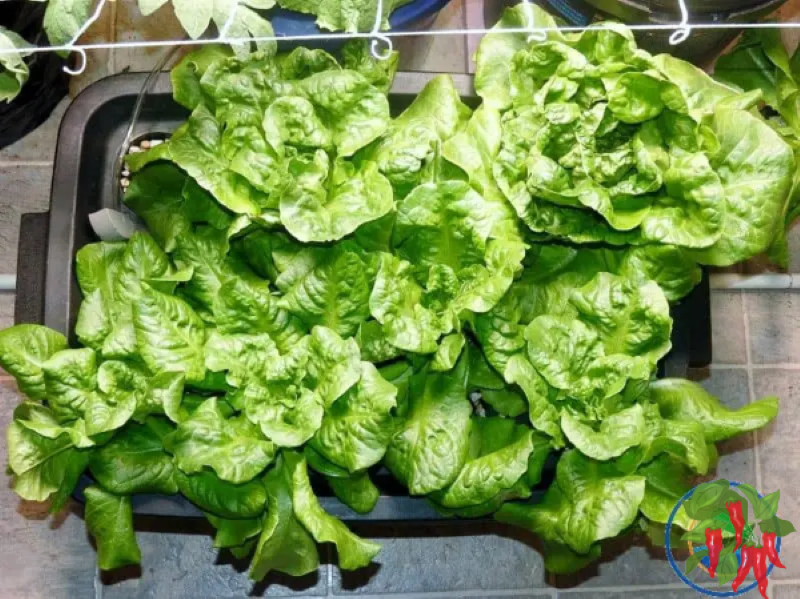
🥬 Fast & Easy Leafy Greens
- Lettuce (butterhead, romaine, looseleaf)
- Spinach
- Arugula
- Baby kale
- Bok choy and other Asian greens
These greens don’t need long growing seasons or deep root systems, making them ideal for Kratky, DWC, NFT, and ebb & flow systems.
🌿 Herbs
- Basil
- Cilantro
- Parsley
- Mint (best in its own container)
- Dill
- Oregano
Herbs are incredibly forgiving and can be grown in Kratky jars, wick systems, or coco coir drip setups. They’re a great confidence booster if you’re new to hydroponics.
🍃 Microgreens & Baby Greens
- Radish microgreens
- Broccoli microgreens
- Pea shoots
- Sunflower shoots
Microgreens grow in 7–14 days and can be grown in shallow trays using coco mats or a thin layer of grow media. They’re fast, nutrient-dense, and perfect if you want quick results.
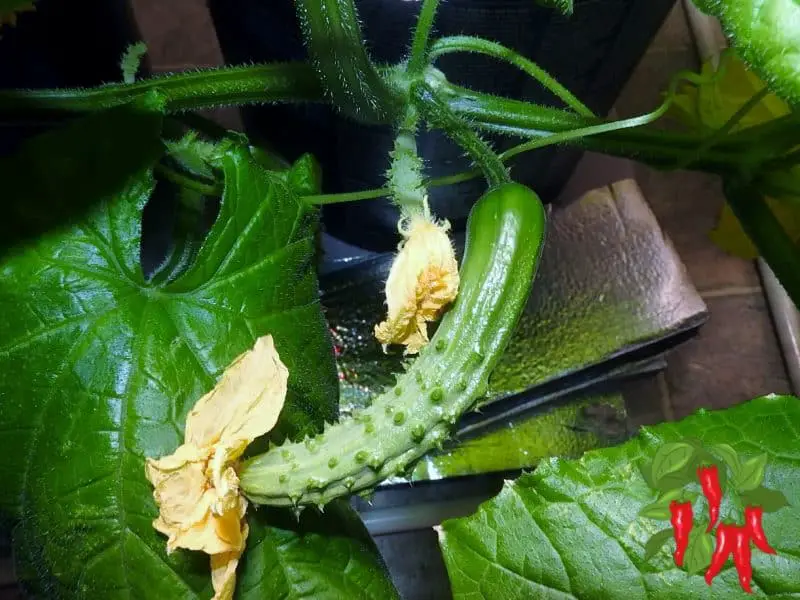
🌶️ Compact Fruiting Vegetables
- Dwarf or patio tomatoes
- Mini bell peppers
- Compact hot peppers
- Bush-style cucumbers
These plants do best in coco coir with a top-feed drip system or autopot-style setup. They need stronger light and more nutrients than leafy greens, but the payoff—fresh peppers or tomatoes indoors—is worth it.
6. Light Requirements for Hydroponic Vegetables

Light is one of the most important pieces of the puzzle. Without enough light, even the best hydroponic system will struggle.
🔆 Leafy Greens & Herbs
- Light duration: 12–16 hours per day
- Type: Full-spectrum LED grow lights
- Height: About 8–12 inches above the plant canopy
Greens don’t need extremely intense light, which makes them perfect for shelves, countertops, and small grow racks.
🍅 Fruiting Vegetables (Tomatoes, Peppers, Cucumbers)

- Light duration: 14–18 hours per day during vegetative growth
- Intensity: Brighter LEDs or multiple bars
- Placement: Keep lights close enough to prevent stretching, but not so close that leaves bleach
A good rule of thumb: if your plants are stretching and leaning toward the light, they probably need more intensity or a closer light source.
7. Nutrients, pH, and EC (Without the Headache)
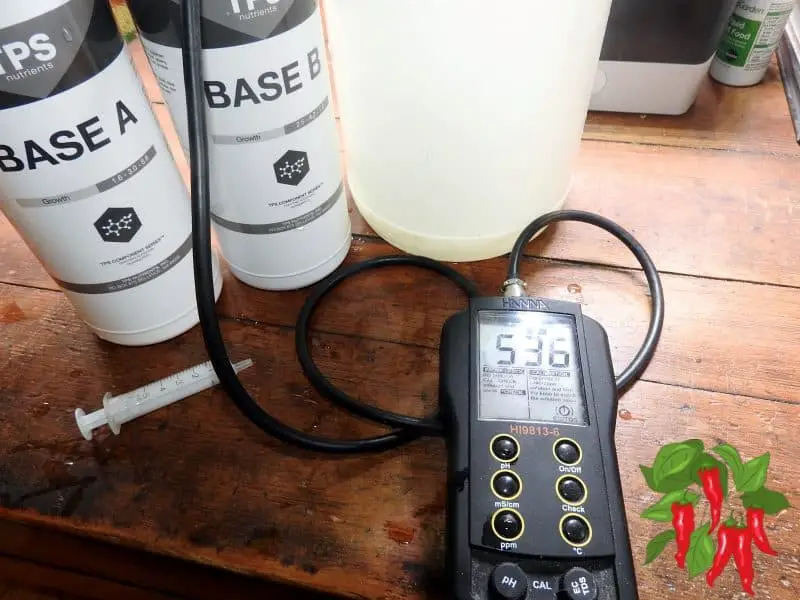
Hydroponic nutrients can feel intimidating at first, but you don’t need to become a chemist. Most beginner-friendly products are premixed and come with simple instructions.
🧪 Hydroponic Nutrients vs. Regular Fertilizer
Hydroponic nutrients are designed to fully dissolve in water and provide all the macro and micronutrients your vegetables need, including:
- Nitrogen (N)
- Phosphorus (P)
- Potassium (K)
- Calcium, magnesium, sulfur
- Trace elements like iron, manganese, zinc, and copper
📊 NPK Basics for Vegetables
- Leafy greens: Prefer more nitrogen for lush leaf growth.
- Fruiting vegetables: Need balanced nutrients early on, then more potassium and phosphorus once flowering starts.
💧 pH Range
Most hydroponic vegetables do well in a pH range of 5.5 to 6.5. A simple pH test kit or digital meter will let you monitor this.
If pH drifts out of range, plants may struggle to absorb nutrients even when they’re available.
⚡ EC / PPM (Strength)
- Leafy greens and herbs: Low to moderate nutrient strength.
- Fruiting vegetables: Moderate to higher strength, especially when fruiting.
To keep it simple, follow the nutrient manufacturer’s “vegetable” or “leafy greens” schedule to start. You can fine-tune later once you gain experience.
8. Setting Up Your First Hydroponic System (Step-by-Step)
🥤 Setup 1: Simple Kratky Jar for Lettuce
- Choose a light-blocking jar or paint/wrap a clear jar to keep light out.
- Fill with water and mix in hydroponic nutrients according to directions.
- Place a net cup in the lid and add a seedling in rockwool or a plug.
- Set the jar under a small LED grow light.
- Let the water level drop naturally as the plant grows—no topping off until near the end.
In a few weeks, you’ll have a full head of lettuce ready to harvest.
🪣 Setup 2: 5-Gallon DWC Bucket for Greens
- Drill a hole in the lid for a large net pot.
- Install an air stone in the bucket and connect it to an air pump.
- Fill with nutrient solution and place seedlings in the net pot with clay pebbles.
- Turn on the air pump and place a grow light above the bucket.
This setup is fantastic for larger fruiting plants like tomatoes, peppers, and bush cucumbers
💦 Setup 3: Coco Coir + Top-Feed Drip System
- Fill a pot or bucket with coco coir (optionally mixed with perlite).
- Place your vegetable seedling in the coco.
- Run a small drip line from a submersible pump in your reservoir to the top of the plant’s pot.
- Set the pump on a timer to run short watering cycles throughout the day.
- Return the excess nutrient solution to the reservoir or drain it away, depending on your design.
This is one of the easiest and most productive ways to grow peppers, tomatoes, and larger leafy greens indoors.
🎇 I use this system the most. It’s easy to automate and works best with a flood and drain tray that drains back to a reservoir.
9. Common Beginner Mistakes (and How to Avoid Them)
- 🟩 Algae growth: Caused by light hitting nutrient solution. Use opaque containers or covers.
- 🫁 Poor oxygenation: Roots sitting in stagnant water without air stones can rot.
- ⚖️ Ignoring pH: Even good nutrients don’t work well if pH is way off.
- 🔅 Weak lighting: Household bulbs aren’t enough for vegetables.
- ❄️ Cold water: Very cold nutrient solution slows growth and can stress plants.
- 🧂 Overfeeding: Too-strong nutrient mixes can burn leaves and stunt growth.
The good news? Once you see these issues once or twice, they’re easy to recognize and fix.
10. Budget-Friendly Setup Ideas
- 💲 Under $20: One or two Kratky jars, a basic LED bulb-style grow light, and a small bottle of nutrients.
- 💲 Under $50: A small lettuce or herb rail with several jars or containers under an LED bar light.
- 💲 Under $100: A 5-gallon DWC bucket, decent LED panel, air pump, and nutrients.
- 💲 Under $150: Coco coir + top-feed drip system, timer, pump, and LED panel for peppers or tomatoes.
Start small, learn the basics, and then scale up once you’ve had a few successful harvests.
11. Hydroponics FAQ for New Vegetable Growers
How often should I change the nutrient water?
Most systems do well with a full reservoir change every 2–3 weeks, or sooner if the water looks cloudy or smells off.
Can I use tap water?
Yes, in many areas you can. Let it sit for 24 hours or use a simple filter if your water is heavily chlorinated or very hard.
Do hydroponic vegetables taste different?
Many people find hydroponic vegetables taste cleaner and sometimes sweeter, especially leafy greens grown in stable conditions.
Can I grow root vegetables like carrots or potatoes?
It’s possible, but not beginner-friendly. Start with leafy greens, herbs, and compact fruiting vegetables first.
How long until I can harvest?
Lettuce and baby greens can be ready in 3–5 weeks. Herbs may take a bit longer, while peppers and tomatoes need more time to mature.
Do I need a grow tent?
Not necessarily. A grow tent helps with light control and reflection, but many beginners succeed with open shelves, countertops, or simple racks.
Can I mix different vegetables in one system?
Yes, but try to group plants with similar nutrient and light needs—like leafy greens together and fruiting vegetables together.
12. Conclusion & Next Steps
Hydroponics for Beginners doesn’t have to be complicated. With a simple system, a good light, and a basic nutrient routine, you can grow fresh vegetables indoors even if you don’t have a backyard or a ton of experience.
If you’re just starting out, begin with one or two jars of lettuce or herbs, or a single DWC bucket. Once you see how quickly your plants respond, you can move into coco coir and top-feed drip systems for peppers and tomatoes.
When you’re ready to keep going, here are some helpful next steps on your site:
- Indoor Vegetable Growing Methods: Easy Systems for Every Space
- How to Grow Vegetables in a Closet for Beginners
- Indoor Herb Growing Guide: Easy Herbs You Can Grow in Any Space
- Microgreens & Baby Greens category
References
- University of Minnesota Extension – Small-Scale Hydroponics Guide
- UNR Extension – Hydroponics: A Brief Guide to Growing Food Without Soil
- Oregon State University Extension – Hydroponics Overview (Hydro Hints)
- Penn State Extension – Basics of Hydroponic Production
- Oklahoma State University Extension – Hydroponics Fact Sheet
- University of Florida IFAS – Building a Floating Hydroponic Garden